Personal Website Setup Guide
A complete walkthrough of setting up your own personal website from scratch — empowering you to showcase your work and ideas online.
Philosophy: Minimalist, Efficient, Free
How to build your own lightweight website?
(0) Core Tools
Before we begin, let’s introduce the core tools this site depends on:
- Jekyll: A simple static site generator. Jekyll allows you to write content using Markdown or Liquid templating language and converts it into static HTML files. It’s perfect for blogs and documentation sites, supports plugin extensions, and can easily integrate various features.
- Minimal Mistakes: The minimalist theme used by this site. Minimal Mistakes provides rich layout and style options, supports responsive design, and displays well on various devices. It also integrates many Jekyll plugins, simplifying site configuration and management.
- GitHub Pages: A web hosting service provided by GitHub. Through GitHub Pages, you can host static websites for free, with seamless integration with GitHub repositories, supporting automated deployment and version control - perfect for personal blogs and project documentation.
(1) Initial Setup
Next, let’s proceed with the initial environment setup. As engineering students know, setting up the code compilation environment is often the most tedious part. Once completed, the subsequent workflow will be very smooth. Please follow these steps carefully:
- Log in to GitHub and create a new repository. Name the repository
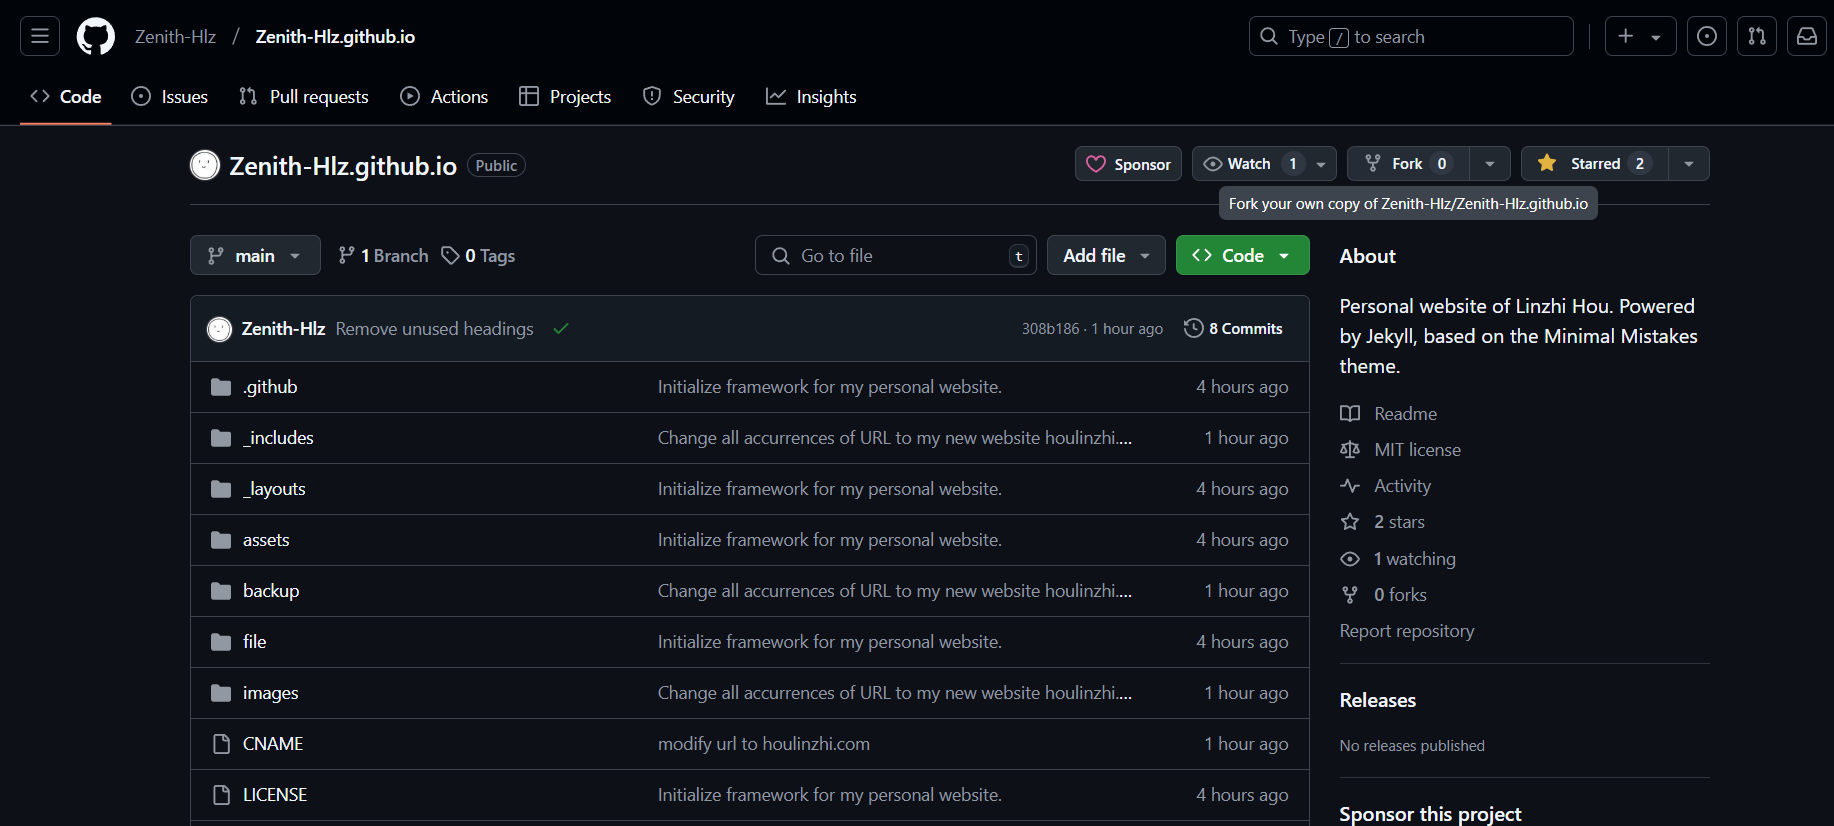
username.github.io, whereusernameis replaced with your GitHub username. For example, if your username isZenith0ra, the repository name should beZenith0ra.github.io. - If you find it difficult to build a repository from scratch, you can directly fork the author’s repository and modify it according to your needs. Here are the specific steps:
First, click the Star button in the top right to support the author’s work🥰- Key step: Click
Forkin the top right to enter the Fork configuration interface. - Set the Repository name to:
[your username].github.io - Note: Make sure the capitalization in your username and repository name matches exactly!
- Check “Copy the
mainbranch only” (you only need to copy the main project branch) - Finally, click
Create forkto complete the repository copying
Congratulations, you’ve completed half of the entire configuration process! If you encounter any problems in the above steps, remember to make good use of the STFW (Search The Friendly Web) principle - search online for relevant information to solve problems.
(2) File Explanation
Next, let’s start customizing the repository content. First, let’s explain the purpose of each file and folder in the repository:
Root Directory Files
1
2
3
4
5
.root directory
├── _config.yml  Core configuration file for the website, almost all modifications start here.
├── *.md         Markdown files that make up each page of the website, such as homepage, blog, about page, etc.
├── CNAME        Used for binding custom domains. If you have your own domain (e.g., houlinzhi.com), you can use this file to replace the default .github.io address.
├── LICENSE      Repository license file. Usually MIT license, indicating the code repository can be freely copied and modified. (Optional)
_config.yml: This is the “brain” of the Jekyll static site, determining the website’s title, theme, navigation, author information, and other content. We’ll explain how to configure this file in detail later.*.mdfiles: Markdown files in the root directory, such as index.md which is usually the main content of the homepage. Using Markdown’s clean syntax, you can easily write rich page content.CNAMEfile: If you have your own domain, adding it to this file will complete the domain binding. Otherwise, you can directly use the GitHub-provided [username].github.io address.LICENSEfile: Determines the usage rights of the code. Choosing an appropriate license not only protects your intellectual property but also provides clear reuse instructions for others.
Repository Folder Introduction
1
2
3
4
5
6
7
8
.root directory
├── _includes HTML code components of the website, not recommended to modify
├── _layouts  HTML code layouts of the website, not recommended to modify
├── assets    CSS, LESS, JS code for website styling, not recommended to modify
├── backup    For backing up files for future reference when making modifications
├── _posts    Stores personal blog .md files and corresponding image assets
├── files     Stores personal files like CV/resume for setting access links
├── images    Stores media files like .jpg for setting access links
_includesfolder:
Contains reusable HTML code snippets for the website, such as headers, footers, navigation bars, etc. The default Minimal Mistakes theme is already well-configured, usually requiring no modifications._layoutsfolder:
Defines HTML layouts for different types of pages, like blog pages, homepage, or custom pages. Modifying these files requires some HTML knowledge - refer to theme documentation when making changes.assetsfolder:
Contains CSS, LESS and JavaScript files used for styling and enhancing website functionality. Edit these files if you want to modify the website’s appearance like colors, fonts, etc.backupfolder:
Used for backing up your configurations and important content. Before making major changes, it’s recommended to store old versions here for easy recovery._postsfolder:
The main battleground for personal blogs! Each article corresponds to a.mdfile written in Markdown format for convenience. You can also store blog images here for easy management.filesfolder:
Used to store personal files like resumes, research papers, project documentation etc. Visitors can directly view or download these through absolute path links.imagesfolder:
Stores image resources needed for the website, such as illustrations and logos. When referencing images, using relative path links is recommended for reliability and convenience.
With the above introduction, we now understand the functional roles of each file and folder. This clear organizational structure is a major advantage of Jekyll, allowing even beginners to quickly get started. Next, let’s begin modifying and customizing the files to create your own unique website!
(3) Personalization
After understanding the function of each file, making personalizations becomes much easier. You may notice that after forking the repository and waiting for a while, visiting [your-username].github.io will show a working website - though it still displays the original author’s content.
Therefore, the next step is to make personalizations. Note that I won’t teach you how to configure every file in detail, but rather show you how to modify the main files. For the rest, you’ll need to explore and learn by analogy.
If you don’t have your own domain name, you can directly use [your-username].github.io which is very convenient. In this case, you’ll need to change all URLs in the code to your own [your-username].github.io to make the website updates work. If you have your own domain name, I’ll explain how to configure it later in the article.
First, let’s modify the index.md file, which is the main interface of the website. After editing the text and uploading it to your GitHub repository, if everything is normal, your website will change in 1-2 minutes. The same applies to other files - just modify the .md files and upload them to the GitHub repository to update the website.
Next, let’s introduce how to configure the _config.yml file. .yml is the core file of the Jekyll static site, with the core parts shown below. Other display content doesn’t need modification yet. I’ve written detailed comments in the .yml file, but if anything is still unclear, I recommend STFW (Search The Friendly Web)
1
2
3
4
5
6
7
8
9
10
11
12
13
14
15
16
17
18
19
20
21
22
23
title: Linzhi Hou
url: https://houlinzhi.com

owner:
  name: Linzhi Hou
  avatar: avatar.jpg
  bio: I am an Enthusiastic Computer Science and Technology student at THU. Passionate about coding, AI, and open-source projects.
  email: hlz23@mails.tsinghua.edu.cn
  github: Zenith0ra
  bilibili: 667036156
  zhihu: https://www.zhihu.com/people/lin-zhi-cang-qiong

links:
  - title: About Me
    url: /
  - title: Awards
    url: /awards/
  - title: Schoolwork
    url: /schoolwork/
  - title: Hobbies
    url: /hobbies/
  - title: Blogs
    url: /blogs/
Congratulations! You’ve learned the most crucial part and completed 80% of the work. From here on, you should be able to apply these principles to other content edits with ease. Next, I’ll guide you through some important details that will help reduce your workload during website maintenance. I hope you’ll read through carefully.
(4) Image Link Configuration
You may have noticed that all images in this article are stored in the ./images/ folder. Let’s discuss how to use and standardize image formats to help reduce your operational workload later.
At this point, I want to introduce the first philosophy of Jekyll static sites: Everything is prepared in advance.
This is why Jekyll achieves its lightweight nature - it focuses on upfront configuration rather than backend processing. Therefore, all text, images, and links on each page need to be configured in advance for convenient display later.
As you’ve likely discovered, you only need to use “relative path links” and upload them to your Github repository to complete the media configuration. It’s worth noting that while some of you may be familiar with “image hosting services”, for personal websites that require long-term maintenance, it’s strongly recommended not to use third-party image hosting services.
If hosted images break, you’ll need to spend an enormous amount of time migrating image links - don’t ask me how I know, it’s “a tale of bitter experience”. Additionally, using relative paths will make your website’s image loading 20%-50% faster than third-party services.
(5) File Link Configuration
Now, you may have noticed that on my site, clicking This is my reference book takes you directly to CSAPP.
This brings us to Jekyll static site’s second philosophy: The site world is built on links.
This is another reason for Jekyll’s lightweight nature - it focuses on upfront configuration rather than backend processing. Therefore, all text, images, and links on each page need to be configured in advance for convenient display later.
As mentioned earlier, image media can be configured using “relative paths” (or absolute paths), but for file link configuration, you must use “absolute paths”.
For example, on pages like schoolwork.md in my site, there are hyperlinks that directly access files in the files folder. This is implemented using absolute paths. Here’s how to configure it:
1
2
3
4
[This is my file](https://houlinzhi.com/assets/files/CSAPP.pdf)

[] contains the text content you want to display
() immediately follows, containing the absolute path to the file
Now we’ve completed the configuration process for image and document media. You must be feeling quite excited, right? Learning technology is such a fascinating process, and today has been another day full of achievements!
(6) Custom Domain Configuration
Finally, let’s explain how to configure a custom domain. If you have your own domain, you can bind it to GitHub Pages through the following steps:
Step 1: Configure custom domain for GitHub Pages
- Open your GitHub Pages repository, click Settings -> Pages, and find the Add a domain option.
- Enter your domain name in the input field, for example
houlinzhi.com, and a verification page will appear:- You’ll need to add a TXT record in your domain management backend, following GitHub’s provided instructions.
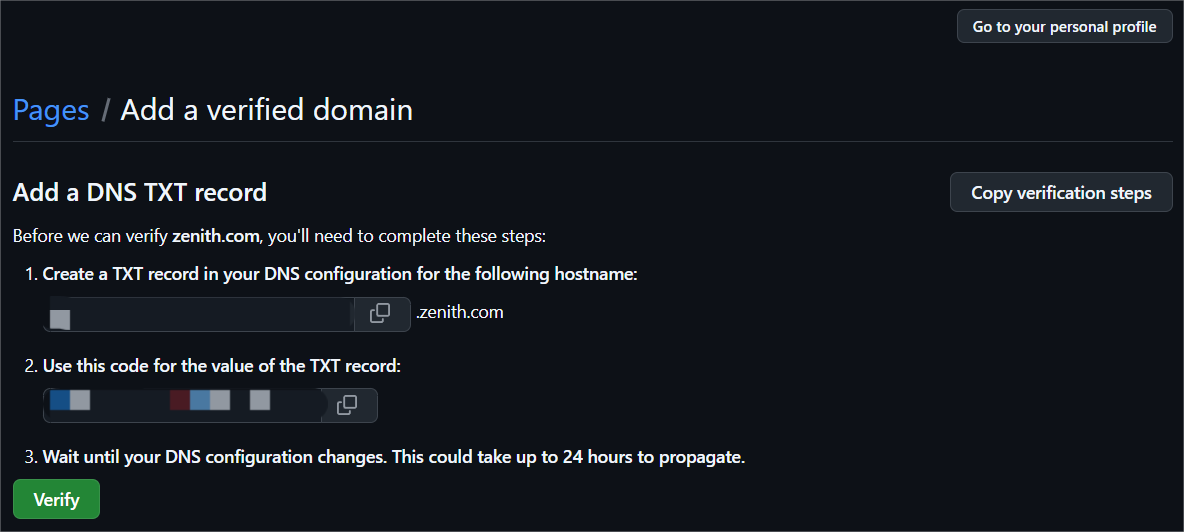
- After waiting for DNS resolution to take effect, click Verify. Once verification is successful, your domain will be bound to GitHub Pages.
- You’ll need to add a TXT record in your domain management backend, following GitHub’s provided instructions.
- Modify the
CNAMEfile in your repository, change its content to your domain name, then upload it to the GitHub repository.
Step 2: Configure DNS Domain Resolution
- Open your domain management backend, find the DNS resolution settings, and add a CNAME record.
Set the host record to
wwwand set the record value to[your username].github.io, then save the settings.1
CNAME www Zenith0ra.github.io
Add the following 4 A records, set the host record to
@, and set the record value to GitHub Pages’ IP addresses1 2 3 4
A @ 185.199.108.153 A @ 185.199.109.153 A @ 185.199.110.153 A @ 185.199.111.153
Step 3: Update Website Configuration File
Since the personal website is based on Jekyll, you need to modify the
_config.ymlfile, set theurlto your domain name, then upload it to the GitHub repository.1
url: https://houlinzhi.com
Step 4: Verify Domain Resolution
- Wait for DNS resolution to take effect, open your browser, enter your domain name, and you should see your personal website.
This way, you have successfully bound your domain to GitHub Pages. If you have multiple domains, you can implement multi-domain binding through CNAME records. For specific operations, please refer to the GitHub Pages documentation.
(7) Author’s Suggestions
To conclude, I would like to discuss some pitfalls I encountered while running a personal website, as well as considerations when modifying this site.
First, what’s free is actually the most expensive. As mentioned at the beginning about Jekyll Philosophy—minimalist, efficient, free—however, running a personal website requires a significant investment of time and energy, learning many new technologies, and stepping out of your comfort zone. The so-called “free” comes with the cost of learning.
At the same time, during the process of building a personal website, you can learn many valuable skills beyond the classroom that will be fully useful in the future: markdown, Git, HTML, Bash, and more. As long as you persist in learning, you’ll always keep up with the latest era.
What I cannot create, I do not understand. ——Richard Feynman
Second, don’t be afraid of coding. My advice is to never stop learning, never stop coding. In the future world, over 80% of researchers will rely on the power of programming, and we’ve all witnessed the capabilities of ChatGPT. Therefore, whether it’s python, java, R, html, or LaTeX, learning them early will benefit you greatly in the future!
Final Words
Finally, thank you for reading this article. If my blog has successfully helped you build your Jekyll personal website, please give this repository a star in the upper right corner to encourage me to continue maintaining this project.
Thank you for reading this far, until we meet again!